Adobe Photoshop is a powerful and widely-used image editing software that offers a multitude of features and tools. If you’re new to Photoshop, it can be overwhelming to navigate the interface and understand how to make the most of its capabilities. In this article, we’ll explore ten essential tips and tricks that will help beginners get started with Adobe Photoshop and accelerate their learning curve. Let’s dive in and unlock the potential of this remarkable software!
Familiarizing Yourself with the Interface

- Understanding the Workspace: When you open Adobe Photoshop, you’ll be greeted with a complex interface. Take some time to familiarize yourself with the different panels, menus, and tools. The key components of the Photoshop workspace include the Menu Bar, Options Bar, Tools Panel, Layers Panel, and Properties Panel. Understanding these elements will provide a solid foundation for your Photoshop journey.
- Customizing the Workspace: Photoshop allows you to customize the workspace according to your preferences. You can rearrange panels, create custom workspaces, and save them for future use. To customize the workspace, go to the “Window” menu and select the panels you want to display. You can also click and drag panels to different locations, or use the “Essentials” dropdown menu to switch between different preconfigured workspaces.
- Navigating and Zooming: Photoshop offers various navigation and zooming options to help you work efficiently on your images. Use the Hand tool (shortcut: H) to move around the canvas, and the Zoom tool (shortcut: Z) to zoom in and out. You can also use the Navigator panel (Window > Navigator) to navigate the image by clicking and dragging the red rectangle or entering specific zoom percentages in the Zoom Percentage box.
Working with Layers

- Understanding Layers: Layers are a fundamental concept in Photoshop. They allow you to stack and organize different elements of your composition, such as images, text, and effects, independently. Each layer can be edited or manipulated without affecting the other layers. To access the Layers panel, go to Window > Layers or press F7.
- Creating and Deleting Layers: To create a new layer, click on the “Create a New Layer” button at the bottom of the Layers panel. You can also use the shortcut Shift+Ctrl+N (Shift+Cmd+N on a Mac). To delete a layer, select it in the Layers panel and click on the trash bin icon at the bottom of the panel or use the shortcut Shift+Ctrl+D (Shift+Cmd+D on a Mac).
- Layer Opacity and Blend Modes: Adjusting the opacity of a layer allows you to control its transparency. You can change the opacity by using the Opacity slider in the Layers panel or by typing a value directly. Blend modes, on the other hand, determine how a layer interacts with the layers below it. Experiment with different blend modes to achieve unique effects and combinations.
- Layer Masks: Layer masks are essential for non-destructive editing in Photoshop. They allow you to selectively hide or reveal portions of a layer without permanently erasing pixels. To add a layer mask, select the layer and click on the “Add Layer Mask” button at the bottom of the Layers panel. Use the Brush tool (shortcut: B) with black and white colors to paint on the layer mask and reveal or hide parts of the layer.
Basic Tools and Techniques
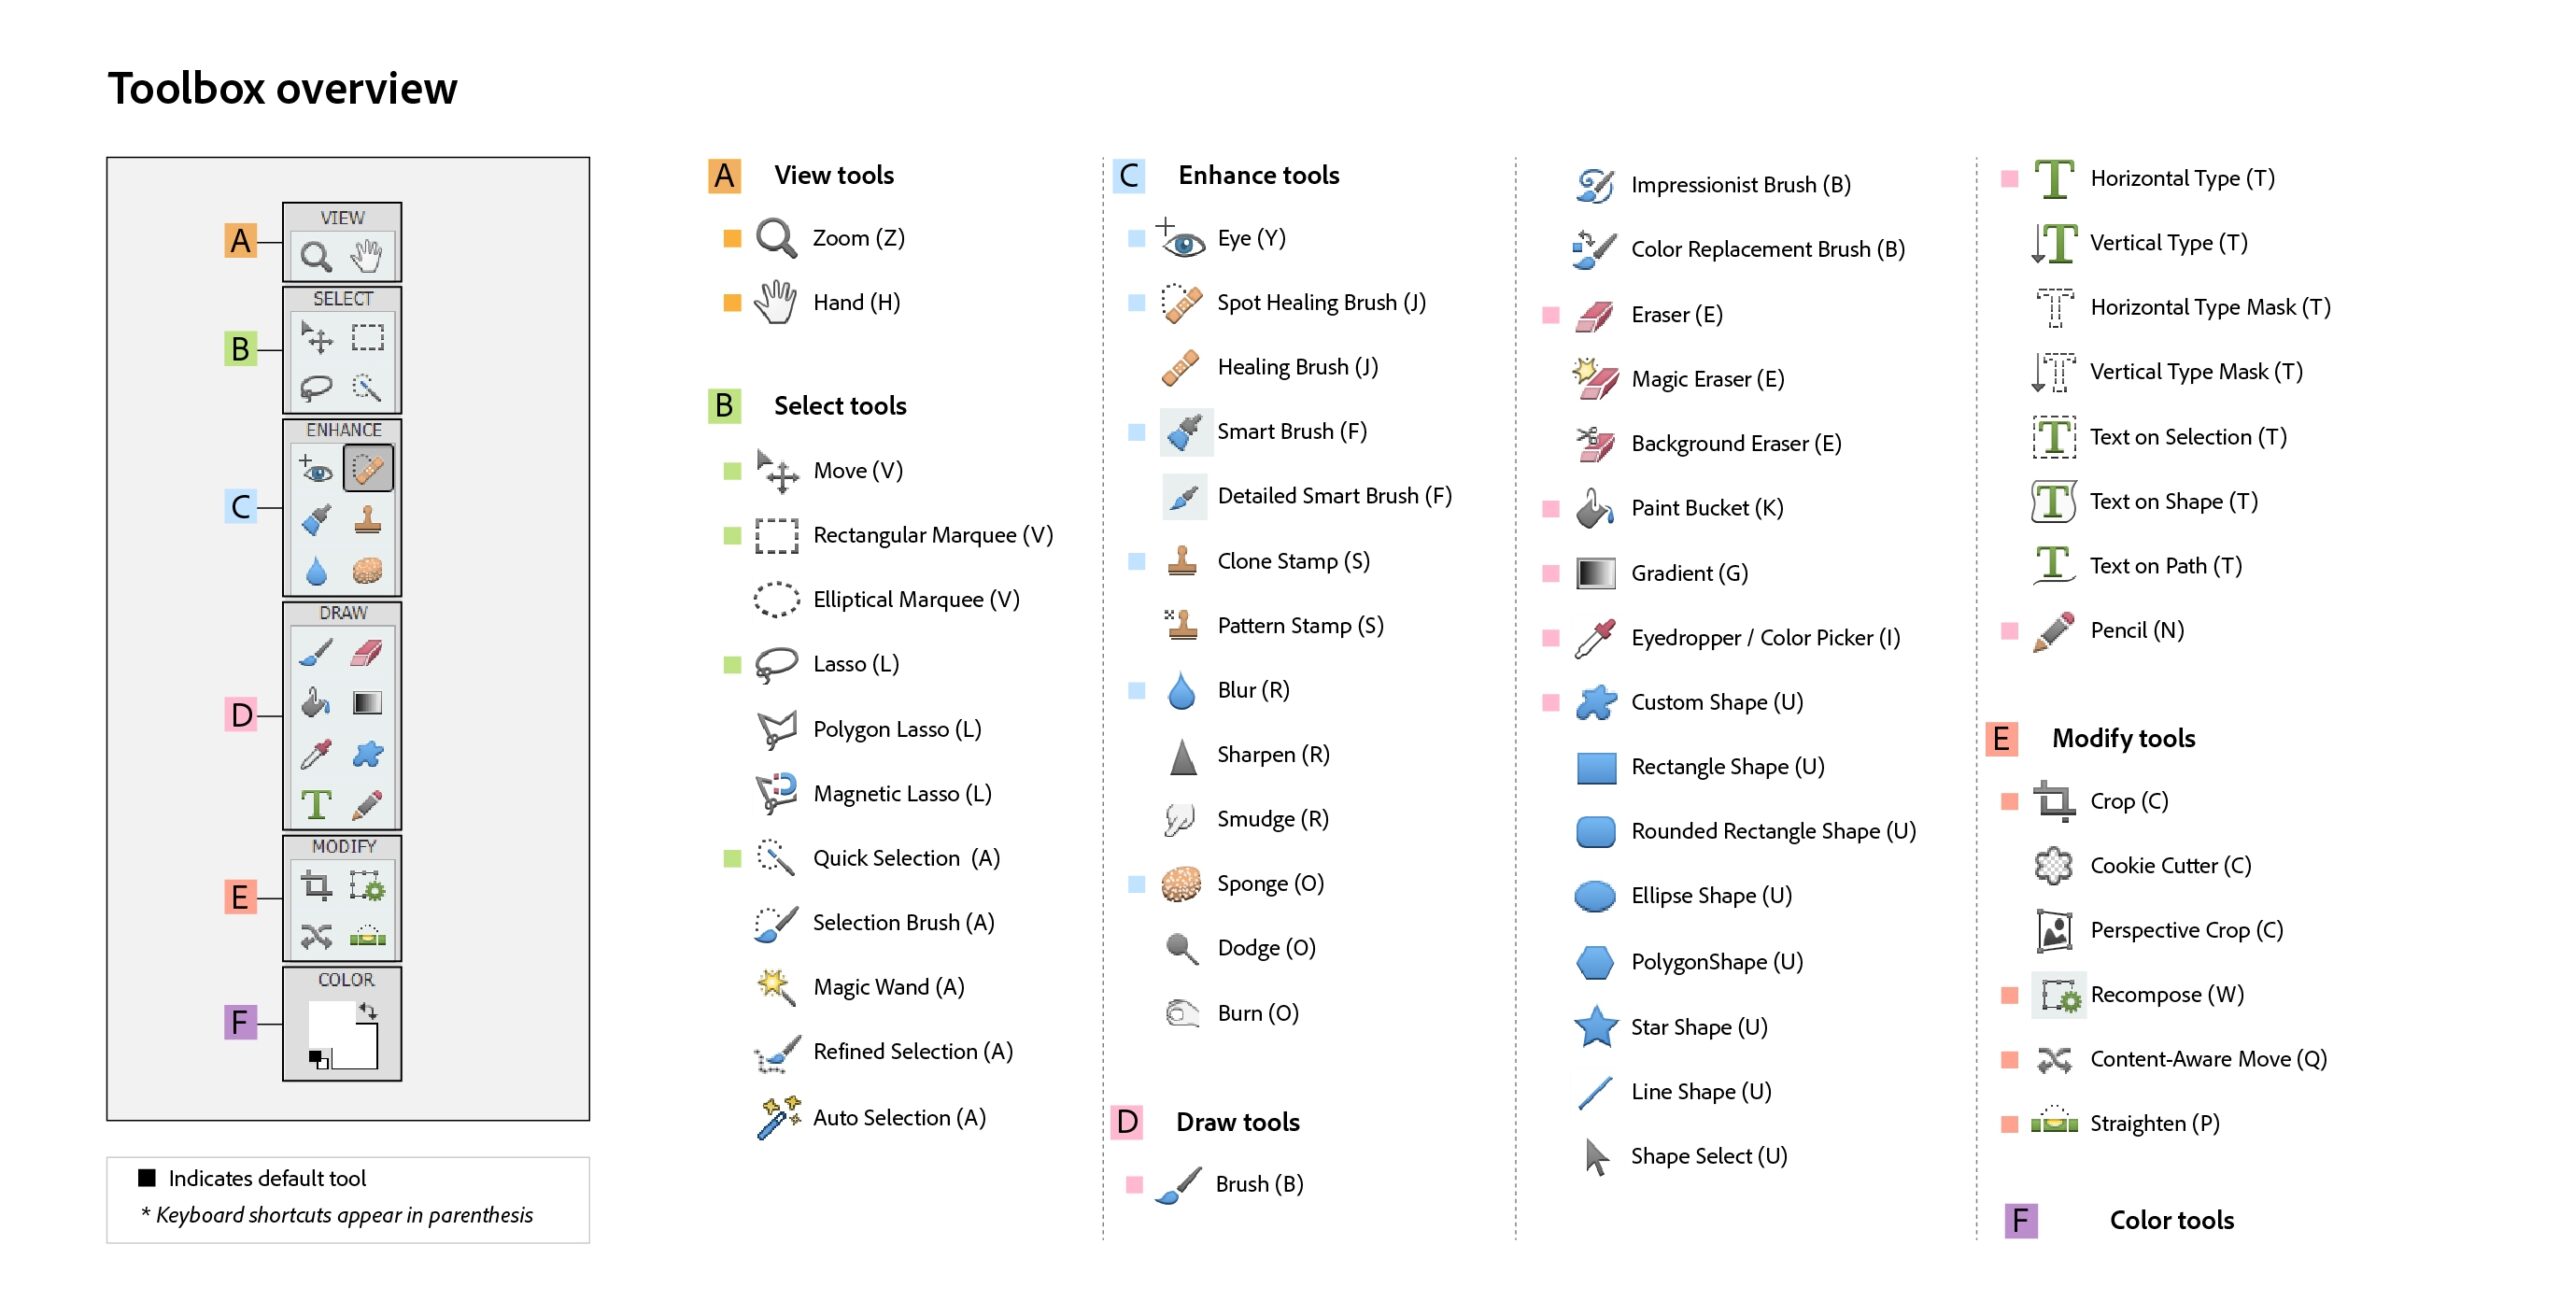
- Selection Tools: Selection tools in Photoshop allow you to isolate specific areas of an image for editing or manipulation. The Marquee, Lasso, and Magic Wand tools are commonly used for making selections. Experiment with different selection tools to familiarize yourself with their capabilities and refine your selections using techniques like adding/subtracting from selections or using the Refine Edge feature.
- Transforming and Resizing: Photoshop provides several transformative tools to scale, rotate, and skew your images or elements. The Move tool (shortcut: V) allows you to move layers or selections within the canvas. To resize an object or layer, select it and go to Edit > Free Transform (shortcut: Ctrl+T or Cmd+T). You can then drag the handles to scale or rotate the selection.
- Adjustment Layers: Adjustment layers are a powerful feature of Photoshop that helps you make non-destructive changes to your images. They allow you to apply various adjustments, such as levels, curves, hue/saturation, and more, without permanently altering the original image. To add an adjustment layer, click on the “Create new fill or adjustment layer” button at the bottom of the Layers panel and choose the desired adjustment.
By following these ten essential tips, you’ll gain a solid foundation in Adobe Photoshop and be able to navigate the interface, work with layers, and utilize basic tools and techniques. Remember to experiment, practice, and explore Photoshop’s vast capabilities to unleash your creativity. If you have any additional tips or tricksto share, or if you have questions, feel free to leave a comment below.